Wireless Wave
Arash, wireless and more
All the packages you need to install prior to using the NS-3 (3.6 and greater) can be found here: http://www.nsnam.org/wiki/index.php/Installation
The last packages to install are necessary to run PyViz the animator.
How to find a specific header in packet in NS-3
27 Aug 2010You can scan through headers like this:
In above code I tried to find Ipv4Header
And it is possible to access it like:
if (m_isIpv4HeaderFound)
{
NS_LOG_DEBUG("Header Found");
Callback
NS_ASSERT(!constructor.IsNull());
ObjectBase *instance = constructor();
NS_ASSERT(instance != 0);
Ipv4Header *ipv4Header = dynamic_cast
NS_ASSERT(ipv4Header != 0);
ipv4Header->Deserialize(item.current);
delete ipv4Header;
}
- (1) Comment
- Tags: Header, NS-3, packet
NS-3 (NS3) And Eclipse (Part I)
3 Feb 2010This is a short explanation on how I added NS-3 (version 3.6) to Eclipse (Galileo). I use first part from NS-3 Wiki
Adding Mercurial to Eclipse
First download eclipse IDE for C++ developers from http://www.eclipse.org
* Install eclipse into you operating system
* Install mercurial eclipse plugin:
– Go to help->software update
– Click on available software
– Click on add a site
– Add http://www.vectrace.com/eclipse-update/ taken from http://www.vectrace.com/mercurialeclipse/ then click on mercurialeclipse and check the box and click on install
* We suppose that you already have mercurial installed on your machine
Making a Clone of NS-3 in Eclipse
After you that you need to add the NS-3 from the repository:
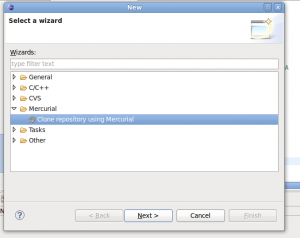
Select: New -> Other, and it would be like picture below:
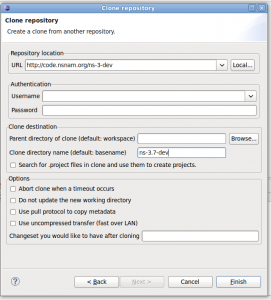
Then press next. now you need to enter “Repository location URL” that is: http://code.nsnam.org/ns-3-dev
in case you want to have different versions of the NS-3 you need to define the “Clone directory name”, in the figure below I chose ns-3.7-dev
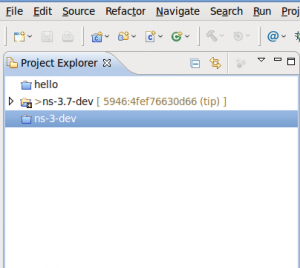
Now you just need to wait for the project files be cloned. then you will find a copy of the project you wanted like below:
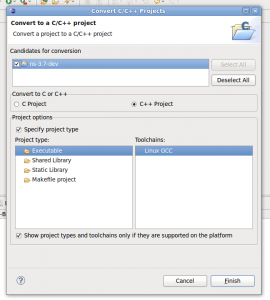
Since the folder is not know as a C++ project it is necessary to be converted to so right click on project name and select: new -> convert to a C/C++ project the rest of settings should be same as picture below:
Configuring the Build system
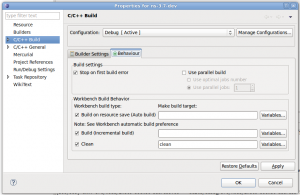
We know that build system for NS-3 is Waf so we need to change the build configuration from build/make to Waf. so right click on project and select the properties then choose the “C/C++ Build”.
In the “Builder setup” choose “External Builder”
Remove the check from “Use default build command”
change “Build command” to ${workspace_loc:/ns-3.7-dev/waf}
in Behavior tab, clear both “Build on resource save (Auto save)” and “Build (Incremental build)
Now all you need to do is to push apply and Ok. you will notice that Waf starts to build the whole project.
UPDATE: Here are some good videos By Reza P. Rezavni on how to have NS-3 on OpenSUSE
- (8) Comments
- Tags: Eclipse, Mercurial, NS-3, NS3, NS3 simulator
ACTION:	[s|r|D]: s -- sent, r -- received, D -- dropped
WHEN:	the time when the action happened
WHERE:	the node where the action happened
LAYER:	AGT -- application,
	RTR -- routing,
	LL  -- link layer (ARP is done here)
	IFQ -- outgoing packet queue
               (between link and mac layer)
	MAC -- mac,
	PHY -- physical
flags:
SEQNO:	the sequence number of the packet
TYPE:	the packet type
		cbr -- CBR data stream packet
		DSR -- DSR routing packet (control packet
                generated by routing)
		RTS -- RTS packet generated by MAC 802.11
		ARP -- link layer ARP packet
SIZE:	the size of packet at current layer, when packet goes down,
        size increases, goes up size decreases
[a b c d]:	a -- the packet duration in mac layer header
		b -- the mac address of destination
		c -- the mac address of source
		d -- the mac type of the packet body
flags:
[......]:	[
		source node ip : port_number
		destination node ip (-1 means broadcast) : port_number
		ip header ttl
		ip of next hop (0 means node 0 or broadcast)
		]
- No Comments
- Tags: trace
A very good article about OFDM and OFDMA :
- (1) Comment
- Tags: IEEE 802.16e, OFDM, OFDMA
Foxdie : To give your firefox a Safari
17 Nov 2009BBC NEWS | Technology | Windows 7 borrowed ‘look’ of Mac
In: windows
13 Nov 2009The very idea of who invented the “windows” on a “desktop” in Windows 1.0 was the basis of a 1988 lawsuit and remains a point of contention.
via BBC NEWS | Technology | Windows 7 borrowed ‘look’ of Mac.
- No Comments
- Tags: Apple, Mac, windows 7
Smart posters and NFC
3 Nov 2009Years ago we could listen to part of the concert from its poster in Sci-Fi Movies, and now it is really possible. Smart posters are equipped with a tag to provide a wide range of information such as audio, video, phone number, contact information, map or simply text.
Suppose you find a smart poster advertising a new mall somewhere, you can either find the address in bottom of the map or just close your phone to read the address, a small map and a picture of the building even a contact phone. Cool! now we know all we need to get to the mall.
To surprise the seller can offer a discount coupon to those who has read the tag.
To get the idea watch the video showing the function (not by me):
- No Comments
- Tags: NFC, RFID, Smart poster
If yo have a laptop and windows Vista/7 with Aero glass effect on. you may noticed that effects are cpu hunger and memory lover. Laptops are supposed to save battery time when unplugged so Aerofoil is what a user need to use as a set-and-forget power manager application to save those precious battery time. It’s a very minimized software with the minimum possible GUI and footprint.
Silent Development: A erofoil 1.5.0 Released.
Aerofoil extends Vista and Windows 7 notebook battery life by:
- Allowing you to manually disable Aero Glass.
- Optionally managing Aero Glass user interface.
- Optionally managing sound muting (NEW!).
- Optionally managing YOUR chosen power plans (NEW!)
- Optionally managing Windows Sidebar.
- Optionally showing a quick hibernate button
- Changing icon colour to show your power type (NEW!)
Z-Wave and Zensys
In: Wireless
25 Oct 2009I found out that there is something called Z-Wave from Zensys, which claims is much better than ZigBee due to its operating frequencies which are at 900 and 800 bands, hence it is isolated from WiFi band (no more potential disturbance.)
According to Zensys:
Z-Wave technology dramatically extends the possibilities of today’s home security systems. Z-Wave lets cameras, sensors and other security components work in concert as a unified system, communicating with each other and with the user whether locally or remotely. A Z-Wave home alert system can also communicate with an outside monitoring agency.
–source Simulation of IEEE 802.15.4/ZigBee with Network Simulator-2 (ns-2) – ZigBee Tutorial.
- (3) Comments
- Tags: z-wave
About this blog
In addition to a daily blog I will try to add our works in wireless network and data communication projects for our courses here
Categories
- My notes (14)
- Network (14)
- Simulation (5)
- Wireless (10)
- IEEE 802.11 (1)
- NFC (6)
- ZigBee (1)
- Our works (2)
- Photography (3)
- Software (7)
- Ubuntu (1)
- Uncategorized (1)
- Usefuls (4)
- Video Game (1)
- windows (2)
- wordpress (4)
- Linus: It says 'constructor' was not declared in this scope. What #includes is necessary for this code? [...]
- padmanabham: how can create end node ie (RFD) in topology. please help me...... thank you................. [...]
- padmanabham: i am doing M.tech project on lowrate WPAN (Zigbee) using star,cluster tree and mesh topology i can [...]
- Layla Wilson: At the least it's more educational than one of our reality TV stars, kim who? Joey what? [...]
- san ramon website design: Right here is the perfect web site for anybody who wants to find out about this topic. You realize [...]
- What do I need to install NS-3 in Ubuntu/Gentoo/Fedora and other Linux distros?
- How to find a specific header in packet in NS-3
- NS-3 (NS3) And Eclipse (Part I)
- (Ke Liu’s) NS2 Wireless trace meaning and explanation
- 3G and 4G Wireless Blog: OFDM and OFDMA: The Difference
- Foxdie : To give your firefox a Safari
- BBC NEWS | Technology | Windows 7 borrowed ‘look’ of Mac
- Smart posters and NFC
- Aerofoil 1.5.0 : a minimal power management app for windows 7 or vista
- Z-Wave and Zensys

